Always feeling tired? Don’t just push through. Instead, work smarter when you’re exhausted. Before we…
Blog Faster: How to Save Time When Writing [Part 4] – Free Download
Are you spending gobs and gobs of time writing blog posts? Are you finding it difficult to gather your thoughts during the writing process? Good news! You don’t have to suffer. There’s something you can do to save time when writing.
In this fourth and final installment of my Blog Faster series, I’ll share with you a blogging tool you can use that will help you to be a more efficient writer. See the first three installments in this series below (if you haven’t already), and then take a look at what you’ll learn when this Blog Faster series concludes.
Here’s what you’ll learn:
- What to do before you start writing your post
- How to speed up your research
- How to keep graphics from sucking your writing time
- How to save time when writing (featuring the one tool every blogger should use) This post!
Save Time When Writing Your Blog Posts
Writing your blog posts may make you feel a bit uneasy especially if you’re not sure how to start. Having a regular workflow will help. A lot.
To develop a consistent writing routine, you should …
Time the Steps in the Blogging Process
Blogging involves more than just writing your thoughts down. As a blogger, it will be helpful to have a go-to system or process to manage all the tasks that you need to complete for each blog post.
Knowing all the steps you need to take will help you come up with time estimates for each one. Some of those tasks will include:
Planning production
- How much time will you have to write blog posts?
- Do you have a blogging schedule for the month (or week)?
Doing keyword research
- Do you know which keywords resonate with readers?
- How will you find and capture those keywords?
Writing posts
- Will you write individual posts or several at once?
- Will you accept guest bloggers?
Creating calls-to-action
- What actions do you want readers to take?
- Will you create one or more standard CTAs to use with each post?
Editing posts
- Will you edit posts yourself?
- Or, will you delegate this task to someone else?
Researching claims
- Will you include external links to credible sources in your content?
- How much time will you devote to research?
Blogging Productivity: 1. List the steps needed to create & promote blog posts. 2. Estimate how long each takes. 3. Plan ahead. #bloggingtips #productivity #productivitytips Share on X
Organizing resources
- Do you have a central location to organize and store your frequently used resources?
- Can you access it easily?
Preparing graphics
- Will you purchase images or use free ones?
- Will you need to edit or watermark them?
Scheduling posts
- Will you publish your posts as you write them?
- Or, schedule them based on a specific schedule?
Sharing posts
- Which social networks will you use to share your posts?
- Will you automate this process?
Planning ahead
- Will you plan your posts weeks or months in advance?
- What types of content will you share?
But, wait! There’s more! You’ll also want to make sure that your post was actually published on the date and time that you set up. And, if there are comments, you should reply.
If you’re thinking that’s a lot of things for you to do, you’re right. But, don’t succumb to overwhelm! Estimate how long each one takes and be sure to …
Use a Blog Post Template to Save Time When Writing
Of all those tasks mentioned above, the most important one is creating valuable content. Without high-quality content, the other pieces of the blogging puzzle won’t really matter. So, getting your writing process down to an efficient science is a very important step.
To blog faster, consider using a blog post template. It’s the one tool I believe every blogger should use to save time when writing.
The template is something you can complete yourself or hand off to your virtual assistant to complete for you (another time saver). Using a blog post template will not only save time, but also ensure that your posts have:
- All the required elements (e.g., introduction, statistics and facts, call to action, keywords, etc.)
- A specific focus (i.e., that it doesn’t go off on unrelated tangents)
Remember, tools only work when you use them, so reach for the template each time you need to grab and organize thoughts from your head to start crafting a post.
Don’t have a blog post template? No worries. I’ve got you covered! Check below for the core pieces you should include in your template.
The one #blogging tool that can make you more efficient is a template. Get one for free: http://bit.ly/FreeBlogPostTemplate #productivity Share on X
Include Core Components in Your Blog Post Template
Welcome to the meat and potatoes portion of this post! Keep reading to learn about the main sections your blog post template should have.
Pssst! I’ve also compiled all this information into a document (PDF) you can download it for free when you get to the end of this post. The template can be a starting point for you and you can revise it to suit your specific needs.
Alright, let’s review the core components your blog post template should include.
Title
This may seem obvious, but your post needs a title. It tells readers what your post will be about. Be clear and also include a keyword in the title of your post. If possible, put that keyword at the beginning of your title. That way, when your content gets indexed (by a search engine like Google), the keyword will be right upfront.
Something to keep in mind: Your title (and subsequent content) needs to sound natural. DO NOT overstuff your title with your keyword. You should be writing for real people — people who are searching for solutions. Write for them. Don’t worry about the robots.
Okay, let’s move on.
Introduction
The introduction, just like the ones you used to write for your high school term papers, shares a bit more about the upcoming content.
The first sentence should really pique the reader’s interest so that they keep reading. The subsequent text will give you a chance to introduce the must-have solutions and compel them to read more.The introduction is also another opportunity for you to include your keyword. Remember, no overstuffing!
Be a more efficient and productive blogger! Download @DAllisonLee's Blog Post Template here: http://bit.ly/FreeBlogPostTemplate #blogging #productivity Share on X
Subheading (You can have more than one!)
Most people don’t finish reading online content before bouncing off to another website. That means you have very little time to capture and keep their attention. Even when they are reading your content, they’re usually not reading every word. They’re scanning the content instead.
This is where subheadings play a very important role in your blog post. They tell your readers what will be coming up next in clear, bite-sized chunks. Using subheadings can help keep them reading, er, scanning longer.
Not only do subheadings help your readers, but they can also help you stay focused and keep you away from the many tangents you might go off on. Think of your subheadings as part of an outline for your blog post (yep, just like those high school papers).
Subheadings — if you write them before you write detailed content — can help you to better organize your main concepts and give direction to your post.
Use subheadings to:
- Ask thought-provoking questions
- Introduce a painful problem (perhaps one the reader didn’t realize they had)
- Share a crucial solution to that problem
- Make a bold or controversial claim
- Introduce your Call to Action (CTA)
- Ask for feedback
No matter how you use them, be sure that your subheadings have the same look and feel. That means you should use parallel structures or consistent word patterns so that it’s easier for your readers to understand what you’re trying to convey.
Keeping the length of your subheading similar and related to your post title will also keep things consistent.
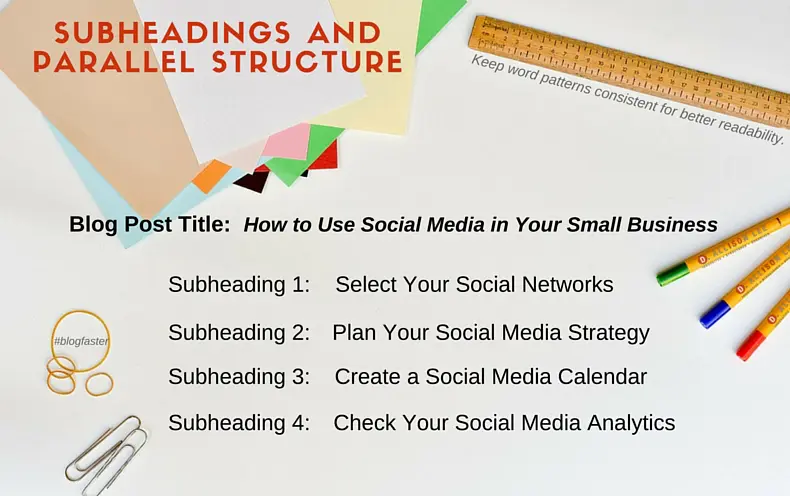
 Notice in the graphic above that each subheading starts with a verb and that the tense is consistent for each.
If the first subheading was “Selecting Your Social Networks,” then the other subheadings would need to follow that pattern as well (“Planning,” “Creating,” and “Checking“).
Bullet Points
Bullet points (unordered lists) are simply a list of statements that you include in your post. Using them can make your post more visually appealing because they take the place of large (or small) blocks of text.
They also help your readers understand what your blog post is about without having to read every word. This will make it easier for everyone, especially those who like to skim posts.
Use bullet points to:
- Drill down complex information into easily readable chunks
- Share the drawbacks of the problem you’re presenting
- Share the benefits of the solutions you’re offering
- Support your bold claims or benefit statements
Another nice thing about bullet points is that you can use them in conjunction with your subheadings (like I’m doing in this post). But, you still need to use them wisely.
Bullet points should be:
Clear and relevant
They should be logically connected to the subheading they’re associated with (makes your content easier to understand).
Short and sweet
Complex and long sentences will defeat the purpose of using bullet points in the first place (simple and concise makes your post easier to read).
Symmetrical
Keep the visual symmetry (whenever you can) by using the same number of lines per point (one line for each bullet, two lines for each, and so on).
Similar grammatically
Use parallel structures when possible: keep a similar grammatical pattern and begin each point with the same part of speech and/or verb tense (makes it easier for readers).
Clutter-free
Avoid using bullet points and sub-bullet points and sub-sub bullet points (too hard to read and your readers will bounce off the page).
Note: you can also use numbered points (ordered list) to create a logical sequence for readers to follow.
A blog post template can help you write faster! Download a free template here: http://bit.ly/FreeBlogPostTemplate #blogging #productivity #bloggingtips Share on XImages
I’ve mentioned before that images posts with graphic content tend to get more traffic than those with just plain text. They also help reinforce your main concepts and themes and break up the text making it easier for readers to navigate your post.
So, in addition to your lead graphic, sprinkle images and other visual content, like videos, infographics, slide decks, “Click to Tweet” boxes, and others throughout your content.
Not sure how many images you might need or where to place them? I usually read through a post and wait for “the moment.” That’s when, after reading for a bit, it feels like an image is needed.
Or, where I would normally feel like jumping off the page. Usually, for me, that’s around 400 to 500-ish words, depending on my mood that day!
Summary
This is your chance to wrap things up and review the main points of your post. It’s not a regurgitation of what you’ve already written, but rather a brief statement that encapsulates the essence of your piece.
You might also consider including a final sentence about what the reader can expect next (like I did with this Blog Faster series).
Call To Action
A Call to Action (CTA) is a marketing tool that, when used well, compels the reader to take an action that you specify.
Those actions can include leaving a comment, joining your list, making a purchase, taking a survey, or, in my case, downloading a free document. More on that in a few minutes.
You will likely have more than one CTA if you have multiple products and/or services. Consider creating several calls to action for each one, and test them out to see which ones work the best (i.e., get the reader to do what you want them to do most often). Once you find the winning CTA, stick with it.
If you’re still reading, this is the end of the post and the conclusion of my Blog Faster blogging series. Thanks for sticking around! The only thing left for you to do is to …
Download the Free Blog Post Template
Are you ready to save time when writing your blog posts? Then, you need to download the free template.
Here’s what you get:
- Instructions on how to use the template
- All core components
- Sample subheadings and CTAs
- Image sources with live links
- Blog post template
Fill out the form below to grab your free template. And, be sure to come back and let me know how it works for you.
Related Posts


Thanks, Debbie, for the tool. We all want to be more efficient in our work. Good information!
You’re welcome! Please come back and let me know how you like the template. =)
The template looks like a good tool for me. Sometimes when I write a blog, I spill my heart. That’s good on some levels, but may not solve problems. The template will help me be sure that I have not only relative content, but a great layout for my readers. Thanks!
The template will certainly keep your content focused. And, if you find that your heart is still spilling over, jot down your ideas and use that to start a *new* blog post when you’re finished with the current one. =)
This info is gold, Deb! I’ve realized lately that I need to step up my blogging game. One of my goals this quarter is to revisit old blogs and add sub headers, CTAs and click to Tweets. Thanks so much for th blogging template.
Excellent idea, Andi, to refresh old blog posts, especially the ones that are most popular. Google Analytics can help you find the ones you should start with first. Good luck with your project. =)
Great series, Deb! Thank you.
Hazel – You’re welcome and thanks! =)
I love this. I am a big fan of bullets. When the content is too long, I use colored text instead. It helps make the highlighted text stand out. Thanks for sharing.
Any change to the text (color or structure) will usually help folks keep reading (or scanning). Thanks for stopping by, Sabrina. =)